
Astrophotography a beginners guide on how to shoot the night sky

Seven Beginner Tips for Photographing the Night Sky
- Night Sky Photography requires a basic understanding of your camera’s ISO settings and long exposures.
- A DSLR or mirrorless camera, a wide-angle camera lens with a f-stop ideally between f/2.8 to f/4 and a sturdy tripod.
- A remote shutter release cable or intervalometer - helps for long exposures without touching the camera and avoids a blurry image. They also allow for longer than 30 secs exposures.
- Camera Settings:
- Shoot in RAW image format – you will have more detailed information for post processing.
- A large aperture f/2.8 to f/4 – dark skies need much more light and this is required for clear stars without blur or trails.
- White balance set to daylight or auto.
- Use the 10 second timer delay.
- Use manual mode or bulb mode – this allows control over exposure, shutter speed and ISO.
- Use manual focus – focus on the moon, a bright star or landmark.
- ISO of 400 - 1600 or more (watch the grain/noise in higher ISO).
- A slow shutter speed - exposure time 15-30 seconds is around the sweet spot.
- A phrase known as the 500 rule – this is a benchmark calculation useful for exposure length to avoid star trails and blur. The idea being the focal length of your lens and whether you use a full frame or crop-sensor will decide the time of exposure before stars begin to trail.
Note: this rule is very useful for photographing the Milky Way or wide-angle nightscape photos that include the stars.
The 500 Rule explained: 500 divided by the focal length of your lens = longest exposure in seconds before stars start to trail or blur.
Example: shooting with a 24mm lens on a full frame camera i.e. 500/24 = 21 seconds this can be rounded off to 20 seconds. A 24mm lens on a crop camera for example a Nikon has a 1.5 crop factor i.e. 24x1.5 = 36mm 500/36 = 14 seconds
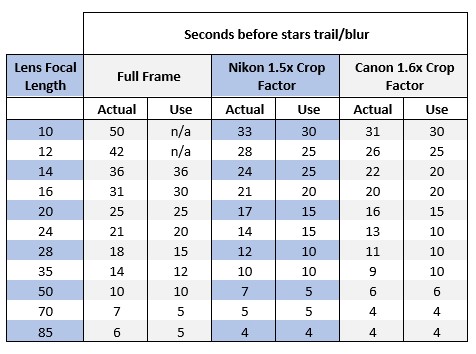
If you have an intervalometer you can use the exact seconds. Set the shutter to BULB and set the intervalometer settings to: Delay – 0, Long – 21, Intvl – 1, N – 1. This will take one shot that is 21 seconds long.
Aperture settings - always as wide open as possible and the lowest ISO settings, but still enabling the target image to be seen. Each camera will have its own ISO range with some much higher than others with no noise. You will need to experiment to find the sweet spot for your camera/lens.
As a starting point try f/2.8 and ISO 800 with a 30-second exposure time, then work from there.
- Setup for taking night sky photos:
- Manual Focus Mode – autofocus will not be able to focus on the stars (they are too small and too dim).
- Focus the camera lens on the brightest star, moon, or planet in the night sky.
- Turn on “Live-View” mode in your camera.
- Look for the brightest star on your LCD screen.
- Zoom in on this bright star, 5x zoom, then 10x zoom, adjust the focus on the lens until the star becomes a small pinpoint of light. This can take a few attempts to find the smallest and sharpest sweet spot.
- Set the camera on your tripod and take at least five photos of the stars in the same spot with the same camera settings. This will allow for star stacking in post processing to really enhance the images. In between sequences shoot a blank shot (cap on, photo of your hand or piece of cardboard) so you know which sequence belongs together.
- Post Processing in Photoshop, Lightroom or other editing software
- The raw images may lack some colour. This is normal and easily fixed in Photoshop, Lightroom or similar editing software.
- For best results you need some software like Deep Sky Tracker or Star Trax (free downloads).
- Using the star tracker software of choice follow their program instructions to stack the images from each series. This will give you a large TIFF file that you can edit in Photoshop, Lightroom or similar software to enhance the image like bring out the deep night sky colours.
- Finalise your edit in Photoshop, Lightroom or other editing software and save your images.